

My Floret Zinnias This Past Summer
Hello friends,
Last spring I sowed all the remaining Floret Zinnia seeds I had in storage, which I had bought from Emerden in 2024. The Floret Previous Metals, Dawn Creek Blush, and Unicorn zinnia varieties were sown into seed raising mix, grown on until they had two sets of true leaves, and then they were potted up into bigger containers with potting mix until I was sure the risk of frost was over.
I planted them in two vegetable garden beds close together, so that I could easily save seed for my own personal stash for the coming years.

And then it was time to wait for them to flower. Due to our horrible summer, which wasn't really a summer, my zinnia plants didn't begin to start flowering until late January, but they were well worth the wait. I had hundreds of flowers in such gorgeous colours ranging from cream, pinks, and orange, all the way to bright red. The range of zinnia flower types flowering varied from singles, to cactus shapes, all the way through to frilly doubles.

Dawns Creek Blush flowers varied from dusky pinks, to pinks, and to purples.


Precious Metals gave me lots of metallics in shades of orange, pinks and purples, and there was even ombré colouring in some of the flowers.


And finally, the Floret Unicorn variety gave me florescent bright pinks and orange and red flowers, with a lot of double flowers amongst them.


I was so happy with my zinnia patch, and I wasn't the only one. Bees and butterflies swarmed over my zinnias all summer and autumn long, and that made it just it that much better in my opinion.


I shared my Floret zinnias on social media, and soon found myself becoming a very small scale flower farmer, as I provided buckets of zinnias to a local flower farmer florist. I very much enjoyed going out into my garden on summer mornings to fill up buckets of zinnias to send away to their new homes.


Unfortunately though thanks to the terrible summer we had, all too soon I had to start seed saving by letting the blooming flowers set seed and turn brown. I managed to save seed from a lot of mature flowers, before the looming threat of a decent frost forced me to save as many older flowers (but not quite mature flowers) in mid-April.

On the 22nd of April we had our first proper frost, and all my lovely zinnias sparkled in the cold autumn sunrise as frost coated them all. By the afternoon the zinnia plants had all turned brown and died.


And so the zinnia season for 2025/2026 has come to an end. I have 5 trays of zinnia flower heads to process over the winter, so I can harvest the seed and store it away until next spring. I am very much looking forward to seeing which zinnia flowers bloom next summer. Zinnias are known to have complex and highly plastic genomes, and have transposons, aka jumping genes, which can lead to unstable genetics, so who knows what I'll end up with. But I'm excited to find out...
Have a wonderful day
Julie-Ann
Want to discuss my post? Feel free to chat with me on Instagram or Mastodon or Bluesky, and now also Facebook.
Crawford Road Autumn Seed Haul
Hello friends,
Last spring I grew from seed a large number of flowering plants, in order to fill my garden with colour throughout the growing season. Some of the plant species I grew and harvested are used as dried flowers, and include plants like Calendula, Love in the Mist, Statice, and Strawflowers.

I enjoyed going out into the garden to harvest these flowers, and spent some time drying them using both the hanging, and flat lay techniques.

I'm not quite sure what to do with all these dried flowers as yet, but for now they're safely stored away in cardboard boxes waiting for the coming colder months, when I will have time to craft with them.
After enjoying growing and harvesting these flowers, I wanted to prepare for next spring by buying some more dried flower seeds from Crawford Road, a New Zealand boutique seed company.

I purchased some new to me plant species, including Ammobium Winged Everlasting, Gomphrena QIS Pink, Gomphrena Raspberry Pink, Helipterum Pierrot White, Helipterum Red, and Persian Cress.

I also purchased Matricaria Magic Lime Green, Matricaria Vegmo Snowball, Verbena Bonariensis Vanity, and two zinnia seed varieties, Zinnia Jazzy Mix and Zinnia Persian Carpet. Zinnias are not only great as fresh cut flowers, but they also dry well, and they keep their colouring for months as long as they are stored properly.

And finally I bought some more Strawflower (Apricot Peach, Cranberry Rose, Creamy White, Purple Red, Silvery Rose) and Statice seed varieties (Forever Happy, Pale Blue, Pink Pokers, QIS Lavender, and QIS Rose).


All my new seeds are now entered into my seed database, and stored in my seed storage boxes.

My plan was to sow some of them this autumn, but life has been busy, so they will now have wait until spring. I'm looking forward to seeing all these new flower varieties next growing season.
Have a wonderful day
Julie-Ann
Want to discuss my post? Feel free to chat with me on Instagram or Mastodon or Bluesky, and now also Facebook.
Tomato Seed Saving In Late Summer
Hello friends,
Late summer and early autumn is the perfect time of the year for seed saving in your garden. One of my favorite plants to save seed from are tomato plants. After a number of years of finding the perfect tomato varieties for us to grow, I like to save these seeds, as they have become acclimated to our growing conditions.
Each year I harvest the most squishy and ripe Pomodoro, Juanne Flamme, Hera, Grosse Lisse, Italian Island Bay, and Lebanese tomatoes off the vine, and then I bring them into the kitchen to process. My best advice for doing this is to label each tomato with a sharpie as you take each tomato variety off the vine, as otherwise, I promise you, you will forget which tomato variety is which...

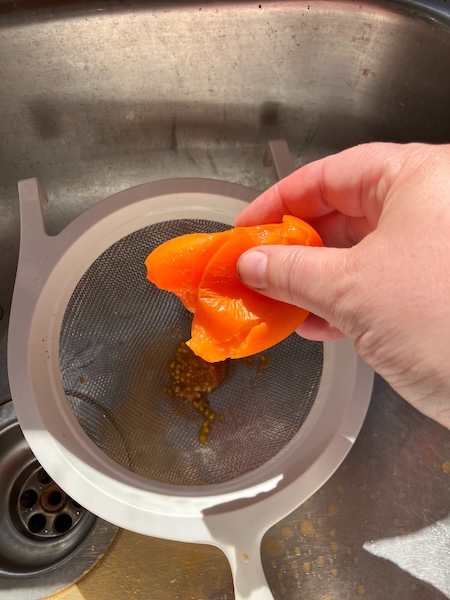
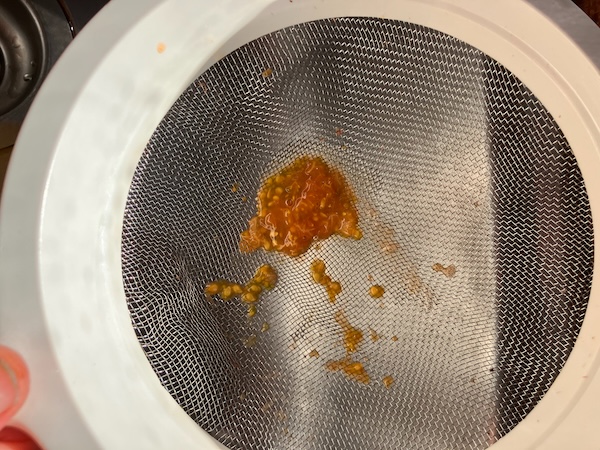
The next step is to squish each tomato over a kitchen sieve to catch all the seeds, and then scoop out any seeds which are still attached to the tomato flesh. Once all the tomato seeds are in the sieve, wash them with water to remove the protective gel coating. Using your fingertips to pry the seeds from the gel coating really helps a lot with this step.
Once the seeds are as clean as they can be, hit the sieve containing the seeds onto a paper towel which is labeled with the seed variety. Spread the seeds out onto the paper towel and leave them to dry overnight.
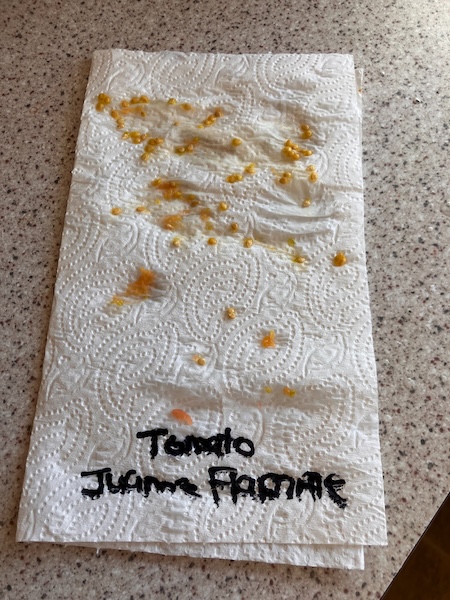
The next day peel the dried seeds off the paper towel and pop them into a paper seed envelope (or whatever system you normally use). Store them over autumn and winter until it's time to sow seed once again.

Seed saving really is a great way to not only save money while gardening, but also to grow plants which are acclimated to your growing conditions.
Have a wonderful day
Julie-Ann
Want to discuss my post? Feel free to chat with me on Instagram or Mastodon or Bluesky, and now also Facebook.
Rearranging the South Side Garden
Hello friends,
This summer I wasn't very happy with my south side garden. The blueberry bushes weren't getting enough sun, and didn't produce many blueberries, and the gooseberry bush as always didn't produce very nice fruit for us to eat.


As I was tidying up our blackcurrant bush after we finished harvesting its fruit, the gooseberry bush beside it poked me in the butt for the very last time. I was sick of getting attacked by it, and also since it wasn't producing any good fruit, it was time to pull the whole thing out from the ground. Before you can say "where's my garden fork", I had started cutting the gooseberry bush back so I could access the inner part of the plant.

I did indeed get out my garden fork, and dug out the gooseberry bush within in a matter of minutes. The hardest part was shoving all the gooseberry bush cuttings into a green waste bag without getting stabbed by it as I did so.


With the gooseberry plant out of the ground, I turned my attention to the blueberry bushes. I dug them out and transplanted them into large orange pots which recently held dahlia seedlings (before I made the decision that I didn't want to keep them in my breeding program). After filling up the pots with potting mix, planting the two blueberry bushes, and giving them an appropriate blueberry fertiliser (acid based), I moved the pots into their final positions on the patio.


Now the blueberry plants get all day sun, and they are much happier, even putting on new growth within their first week. Their small amount of fruit from this season have finally started changing colour, after staying green all summer long. I now just have to keep remembering to water them regularly so they don't dry out.

As for the empty spaces in the south side garden, I used some of my flower farming earnings to invest in two hydrangea bushes. The south side garden gets more shade than anywhere else in the garden, and also we need some privacy on that side of the house due to a nosy neighbour. I chose the paniculata hydrangea, Limelight, for the gooseberry spot, and it has conical shaped lime green/cream flowers which are popular in the floristry industry, and as a bonus it also reaches up to a height of 2 m tall.


In the blueberry bushes position, I planted the paniculata hydrangea Sundae Fraise, which has creamy flowers which transition to strawberry pink flowers in autumn. It is a stunning hydrangea which reaches 1.5 m tall, making it perfect for giving us some more privacy on that side of the garden.

This wasn't a planned gardening project when I started out pruning the blackcurrant bush, but I'm very pleased with how it has turned out. Hopefully in the future I will get bigger blueberry harvests, and the hydrangea plants will provide us both privacy and flower farming income in the years to come.
Have a wonderful day
Julie-Ann
Want to discuss my post? Feel free to chat with me on Instagram or Mastodon or Bluesky, and now also Facebook.
Social Media


Archives