

Christmas Cross Stitch Framing Project
Hello friends,
I finished a Christmas cross stitch project in back in December last year, and it's been sitting in my craft room, judging me, ever since then. And since December is nearly upon us once again, I thought it was finally time to get it finished, and I thought I'd share with you my method of framing it.
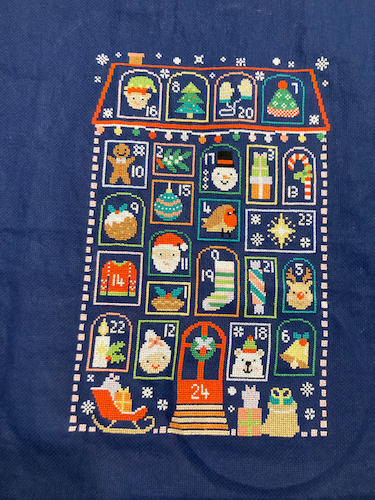
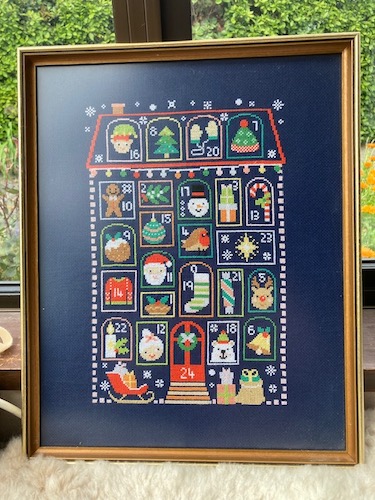
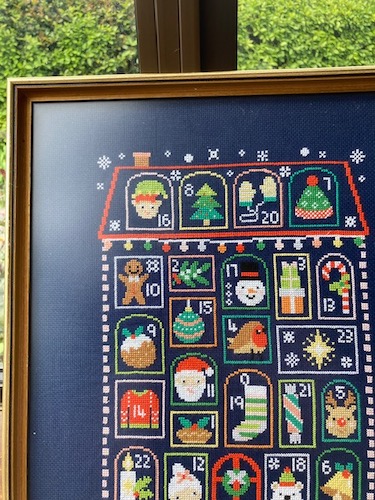
The Christmas cross stitch project I finished was the pattern "Stitch Into Christmas" Stitch-along, which was designed by Caterpillar Cross Stitch in 2022. The pattern was split up into 6 parts, and every two weeks a new part was released for you to stitch. I finished the pattern on the 28th of November in 2022, and I used the called for DMC floss, and a fat quarter of 16 count navy aida.
The first step in prepping a project like this for framing, is to wash and wet iron the project. The project is soaked in luke-warm water for an hour with a small squirt of Eco Store Eucalyptus Eco Wool Fabric Detergent, along with a couple of Sard Colour Catchers (you can get them from your local supermarket). Even though DMC and Aida are technically colour fast, it always pays to be careful, since hundreds of hours of stitching work are on the line.
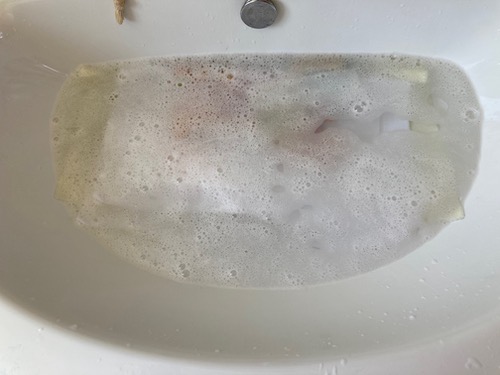
After this, the next step is to rinse the project in more luke-warm water. Once the water runs clear and bubble free, I throw the project into the washing machine on fast spin setting to remove all the excess water. The next step then is to iron the project while it is wet, as this helps remove any creases that have formed over the long term.
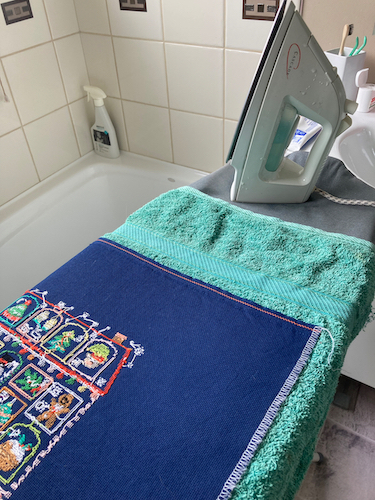
In order not to squish the cross stitch stitches, a double-layered towel is placed on the ironing board, and the cross stitch project is ironed upside down on this, with the iron set to a low cotton setting with full steam.
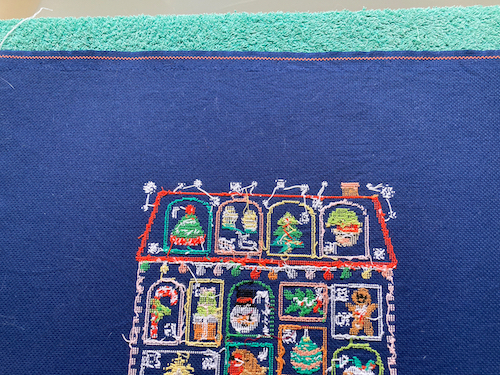
Once all the creases are out, the project is then left to air dry for a couple of days. After that I repeat the ironing process to remove any remaining creases.
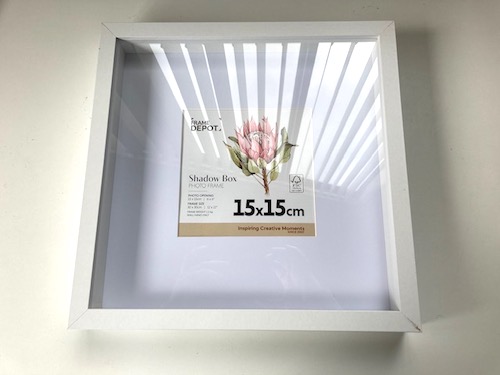
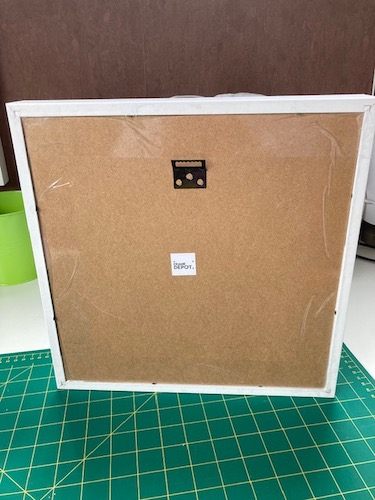
The next step is to get a picture frame that the project fits into. I usually look for old picture frames in second hand stores, but sometimes the only choice is buying new if you can't find a picture frame that fits. In the next set of photos, I'm sharing the set up I used for framing a cross stitch project for my sister.
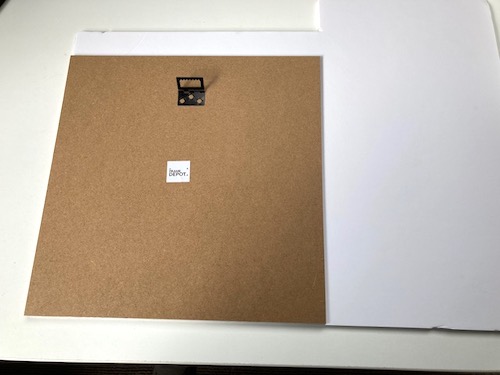
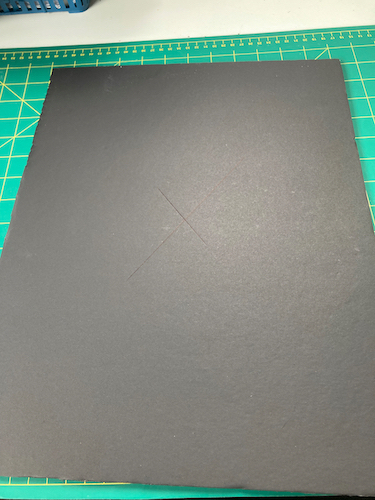
The back of the picture frame is used to measure out board foam which will be the backing for the cross stitch project: all that I had on hand was 5 mm board foam, but 3 mm is better. Cut out the measured board foam with scissors or a craft knife. Then check the foam board fits within the picture frame with a little bit of wiggle room to spare, as you have to leave space for the cross stitch fabric.
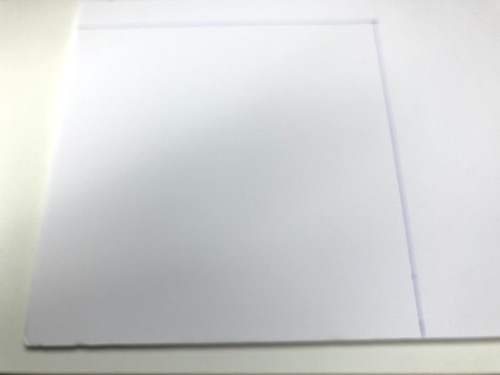
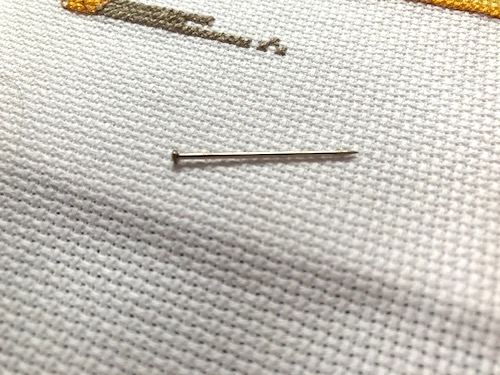
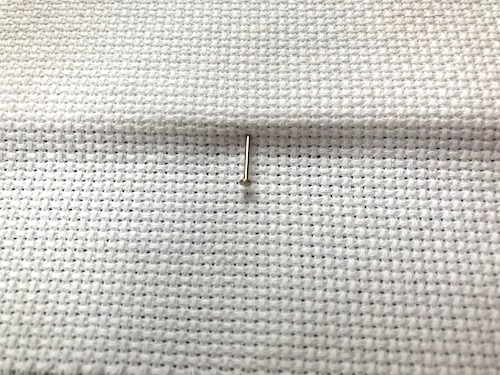
Then use a ruler and a light pencil to make a small X in the middle of the foam board to find the exact middle, and then place a pin vertically through the middle of your cross stitch project by using your pattern as a guide. Then place the pin vertically into your foam board in the middle of the X drawn. Your cross stitch project will then be centered, and then you rotate your project to get it squared up using the aida lines as a guide.
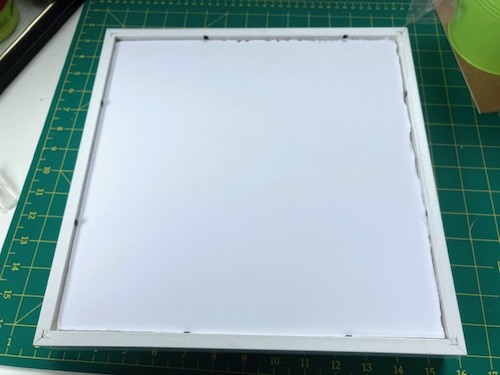
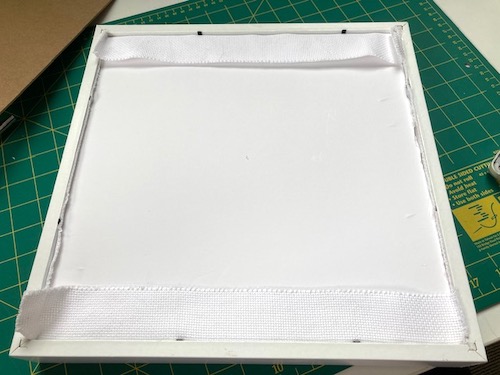
Once you have your cross stitch project all centered and in the right place, it's time to hold it in place using Sequin and Bead Pins. I'm not sure exactly when and why I got my set of pins, but I've found they're perfect for framing cross stitch projects. Slide them into the foam board through the cross stitch fabric, and all the way in, so it's permanently in between the two cardboard layers of the foam board. I start by putting one in the middle of each side, slightly pulling on the fabric as I go to straighten it, and then placing more pins all the way along the four ends of the foam board, until the fabric is taut and even and squared across the whole piece. If the cross stitch project is skewed, just take the pins out and try again. Once you're totally happy with the way it looks, it's time to frame the project.
After cleaning the inner glass surface of the picture frame, and removing any cat hair, or any other hair or fluff from the cross stitch project, insert the cross stitch project and foam board into the picture frame.
Flip the picture frame over to make sure you have the project in the right direction, and that it looks squared against the picture frame, and then it's time to trim off any bulky cross stitch fabric on the back side. I try not to trim too much just in case I want to reframe the project in the future, but it's a good idea to remove anything too bulky, especially if there's not a lot of space to fit the backing board back onto the frame.
Once you've trimmed off the cross stitch fabric, just put the picture frame backing back into the picture frame. If it's too snug, and you can't get the pins around the picture frame to fit back onto the frame backing, just grab some tape, and tape it in place. It's probably not the best way to do it, but it's worked for me in the past.
And there you go, framing your cross stitch project is finished! I'm really pleased with how the project has turned out, and it's already up on the wall for Christmas. I found this picture frame at a second hand store for only $5, so it was a great deal.
I hope you give this framing method a go, it's not really too hard, and you can keep playing with things until you are happy with the outcome you want.
Are you getting ready to decorate for the holiday season? We don't decorate until the 1st of December, or the first weekend after that, whichever comes first. We are off work on the 1st, so we'll be pulling out all the decorations, and the Christmas tree then.
Have a wonderful day.
Julie-Ann
Want to discuss my post? Feel free to chat with me on Instagram or Mastodon.
Learning To Play The Harp
Hello friends,
When I was growing up I learned to play the recorder and flute through a local music school, and had lessons for them both for a number of years. The reason why I played the recorder was to learn music, so that I could get into the flute classes later on. As a child I very much looked up to the cool flute players that played in our music school's orchestra. And then there was the flute itself, how can you resist how shiny, and beautiful sounding it was. After a couple of years learning the flute, I finally joined the schools orchestra, and became one of those cool flute players I admired a couple of years earlier.
I had to give up playing the flute when I was a teenager (my parents couldn't afford to buy me my own flute or further lessons), but always remembered playing it fondly as an adult. A couple of years ago I bought my own flute, and began music lessons again, in the same music school I had as a child. I rejoined orchestra, and thoroughly enjoyed it.
But by this time as an adult I had many allergies, chronic sinusitis and many sinus infections. It got to a point that I was sick so much with these issues, that I couldn't play the flute as much as I needed to to stay in lessons and the orchestra.
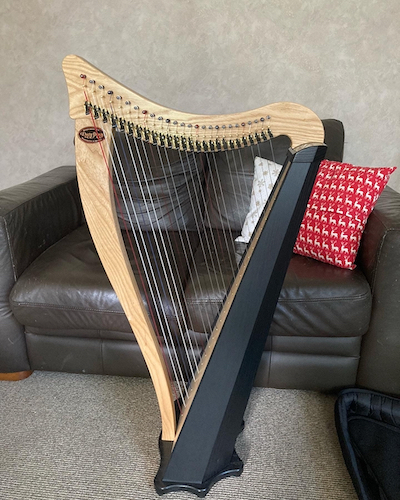
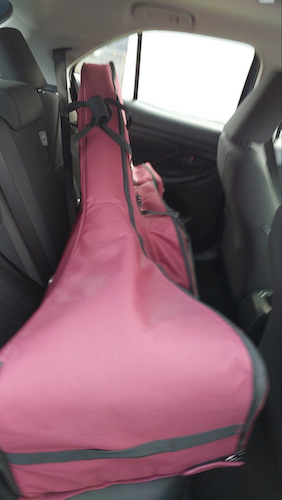
I was feeling down about having to give up playing the flute, and mentioned to hubby that as a child I had also wished to learn to play the harp, but that was way out of my parents league money wise. And in Christmas 2021 there was a very special large surprise under the Christmas tree, hubby had bought me a lap harp so I could finally get a chance to learn to play the harp. It was a Dusty Strings Ravenna 26 lap harp, with full sharpening levers.
I was so happy, and I enthusiastically began learning the harp by myself using the book series by Pamela Bruner. But it got to a point where I struggled to make any more progress by myself, so I began taking online harp lessons in October 2022, with a very wonderful New Zealand harp teacher.
I progressed quickly, and soon outgrew my little lap harp. I couldn't afford to buy a bigger brand new 34 string harp, so I waited for months and months on Trade Me for a second hand harp to come up for auction that I could afford, and that was in driving range within the South Island of New Zealand. In May 2023 a Dusty Strings Ravenna 34 harp finally came up for sale, and luckily I won the auction. The next weekend hubby jumped on a plane to Christchurch, got a hire car, and picked up my new harp, and drove it home. It barely fit in the backseat of the hire car that hubby hired.
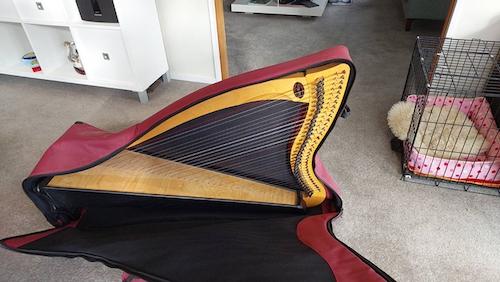
Once hubby and the harp had arrived home, I gave her a good clean, and tuned her up to Eb major. She sounded amazing, but in the future will need to be serviced and regulated. Unfortunately, there is only one harp technician in the South Island, and he only visits Dunedin once a year, and won't return to Dunedin until 2024.
I've continued to learn and improve on my new harp, and today I thought I'd share with you one of the Pamela Bruner pieces I learnt before I started lessons last year. The piece is called Early Waltz, and the composer is Pamela Bruner. My teacher has been encouraging me to perform pieces that I've learnt, so this was my first attempt.
I hope you enjoyed it.
Have a wonderful day.
Julie-Ann
Want to discuss my post? Feel free to chat with me on Instagram or Mastodon.
We Had A Late Frost
Hello friends,
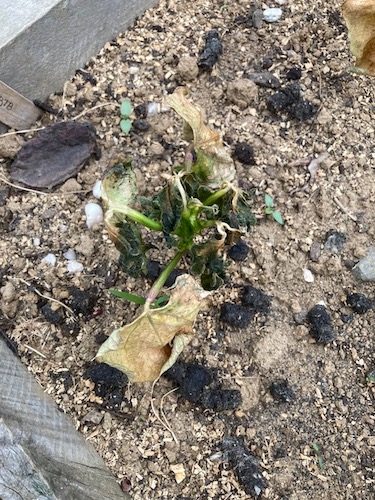
The very worst thing that could possibly happen in the vege garden at this time of the year, happened on Friday the 10th of November when we had a super late frost. The day before had been blue skies and sunny, with a cool breeze. Our local weather forecast mentioned nothing about a frost occurring, so I stupidly trusted their judgement.
We woke up on Friday morning, and it was cold. I quickly checked our weather station, and the temperature in our backyard had dropped to -1.1˚C at around 6 am in the morning. I quickly donned my ugg boots and dressing gown, and raced outside.
So much damage had been done. The ground was white and crunchy with frost, and so was the vegetables in my vege garden.
I was so upset. Thank goodness that everything in my glasshouse was well protected, and most of my dahlias were unharmed thanks to me being way behind in weeding those areas of the back garden.
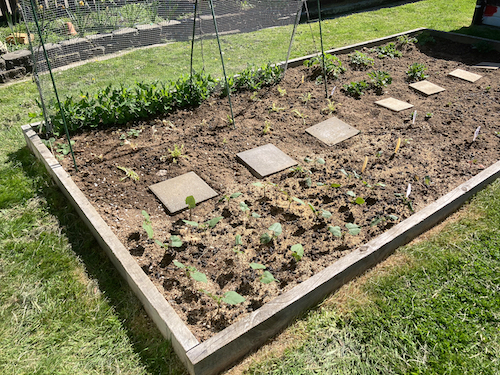
My pumpkins were dead.

And so were my beans.
My potatoes were damaged, but they will bounce back over time.
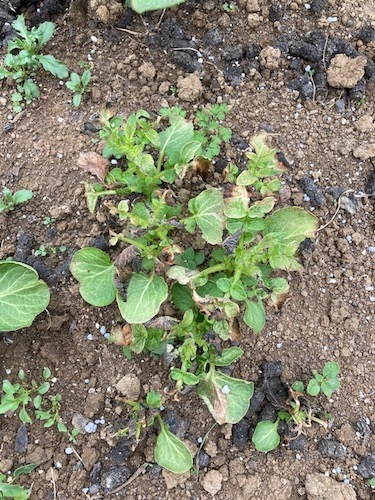
My corn plants were frost burnt, but are putting on new growth already.

After allowing myself to be grumpy for half a day, I pulled out the now dead pumpkin plants and resowed seeds directly into the ground. I'm about to do the same with the bean seeds. I'm not overly hopeful, but it's better than just giving up I guess.
Have a wonderful day.
Julie-Ann
Want to discuss my post? Feel free to chat with me on Instagram or Mastodon.
The Vegetable Garden is Planted
Hello friends,
Over Labour Weekend in October hubby and I planted our vegetable garden for the summer.
My first task was to weed the garlic growing in the smallest vegetable garden bed, and then also sow onions, carrots, beetroot, radish, sugarbeet and carrot seeds as well.
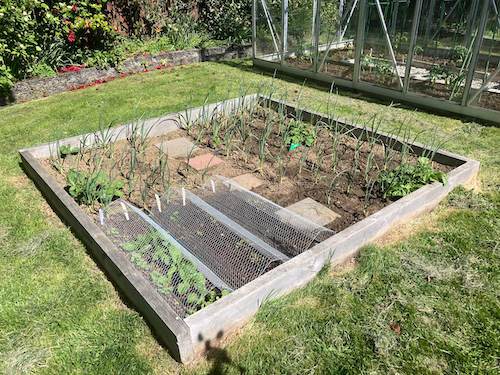
Hubby then dug over the two remaining large garden beds, and I added sheep pallet fertilizer for the soon to be growing plants.
For the next bed, which was already growing peas and potato plants by now, I added lettuce, rocket, black turtle beans, summer sprouting broccoli, and cabbage, that I had been growing in the glasshouse.
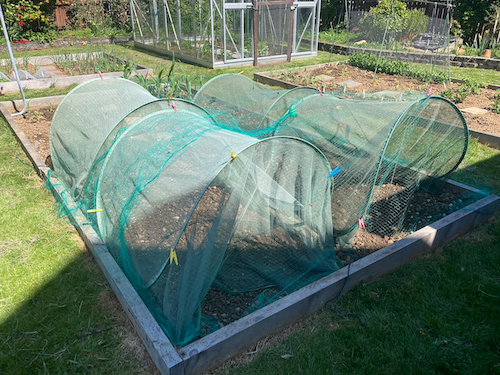
With the last large garden bed I planted maize, corn, and pumpkin plants in the top half. In the bottom half of the garden bed I sowed wheat and linen flax seeds, while hubby acted as a scarecrow to keep the birds off them, and then we double bird netted the seeds to protect them from the birds.

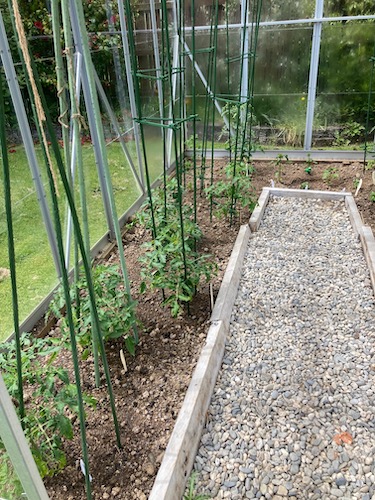
With most of the glasshouse now empty of plants, we emptied out the space, and hubby dug over the garden bed. After that there was just the task of fertilising the soil, and then planting cucumbers, basil, chillies, capsicum and many tomato plants. There was also the big task of setting up all the climbing frames for the growing plants.

It's been a few weeks now, and everything is growing nicely in the garden, despite low snow falling the week after we planted everything. I can't wait to feast on all our vegetables over the coming summer.
Have a wonderful day
Julie-Ann
Want to discuss my post? Feel free to chat with me on Instagram or Mastodon.
Social Media


Archives